How to Install Cold Plunge Fittings Like a Pro
Whether you’re building your first DIY cold plunge or upgrading your current setup, installing the fittings right is what keeps everything watertight and flowing smoothly. Done right, the whole system runs cleaner, lasts longer and doesn’t leak a drop. Done wrong... well, you might find yourself ankle-deep in cold water.
This cold plunge fittings installation guide breaks down the tools, materials, and exact steps to help you install your fittings like a pro—even if it’s your first build. If you are looking for an in depth build guide that includes step by step instructions and photos check out our DIY Build Guides.
What Are Cold Plunge Fittings?
Cold plunge fittings are the connection points that allow you to attach pumps, chillers, filters, or hoses to your plunge tub. They usually include:
- Bulkhead fittings (for watertight wall passes)
- Elbow or straight barbs (for hoses)
- Threaded adapters (for pumps or chillers)
- Unions or quick-connects (for easier maintenance)
Whether you’re using a stock tank, barrel, or custom tub, getting the fittings right is critical to the performance of your whole plunge system.
Cold Plunge Build Step-by-Step: Planning Your Fittings
Before drilling anything, you’ll want to plan your fitting layout carefully. Ask yourself:
- Where will the pump, filter, or chiller sit?
- Do I need gravity assist for drainage?
- How long will my hoses need to be?
- Do I want the option to disconnect components easily?
This stage saves tons of headaches down the line. Keep fittings (especially elbows) as low as possible for optimal circulation and make sure hoses don’t kink.
Speaking of hose, we highly recommend using Flex Spa Hose to ensure a permanent water tight connection. This is the same hose that is used in hot tubs. It has a proven track record and will last a long time.
Tools for Cold Plunge Fitting Installation
Let’s gear up. Here's what you'll need:
- Hole saw (matched to bulkhead size)
- Drill
- Adjustable wrench or channel locks
- Silicone sealant (100% waterproof, aquarium-safe is best)
- Pipe thread sealant (Teflon tape)
- Clean rag or towel
- Ruler or measuring tape
- Marker
Step-by-Step Cold Plunge Fittings Installation Guide
Follow these steps to get leak-free, professional-level connections on your plunge tub.
1. Mark Your Fitting Locations
Use a marker to outline where you want your inlet and outlet ports on your to go. Most builds require at least two fittings: one for water out (to pump/chiller), one for water return (back into the tub). Make sure you’re placing them on a flat surface of the tub.
Pro Tip: Keep fittings 2–4 inches from the bottom of the tub to maximize water circulation and avoid clogging.
2. Drill the Holes
Use your hole saw to cut out the marked areas. Drill slow and steady, especially on plastic tubs or barrels—no need to force it.
After drilling, wipe the area clean of plastic debris.
3. Install Bulkhead Fittings
Slide the bulkhead fitting into the hole, making sure the gasket is on the inside of the tub. Thread the lock nut on from the outside and hand-tighten.
Then use your wrench to secure it further—but don’t over-tighten. You want it firm and snug, not cracked or stressed.
Add a thin layer of silicone sealant around the gasket if you want extra leak protection.
4. Add Threaded or Hose Barbed Fittings
Once your bulkhead is in, you can attach threaded adapters, barbs, or elbows depending on your plumbing plan. Wrap the male threads with Teflon tape (10-12 wraps).
If using hose barbs, slide your hose over the barb (a heat gun helps soften the hose end) and clamp it tight with a hose clamp. While we don’t recommend using barbed fittings we understand the ease of use. Please make sure you have a tight connection and regularly check for leaks.
5. Connect to Pump, Chiller, or Filter
Run your hoses from the fittings to your pump or chiller inlet and outlet. Make sure the flow direction matches the component’s input/output labels. If you are using schedule 40 PVC fittings and flex spa hose you must use PVC primer and glue. If you only use one without the other your plumbing will leak.
If using unions or quick-disconnects, now’s the time to install them—they’ll make maintenance way easier later.
6. Test for Leaks
Before filling up the entire plunge, test it:
- Add 3–5 inches of water
- Check around all fittings for drips
- Tighten if necessary
Once you're confident everything is sealed, fill the tub and run the full system for 10–15 minutes. Double-check all connections again.
Common Cold Plunge Fitting Mistakes (and How to Avoid Them)
Here’s where DIY setups often go sideways—and how you can stay ahead:
- Over-tightening: Can crack plastic tanks or fittings
- Under-tightening: Leads to slow leaks that build up over time
- Not using PVC Primer & Cement: If using schedule 40 PVC fittings this is required to get a permanent leak proof seal
- No Teflon tape: Causes air leaks and inefficient suction
- Poor hose routing: Leads to kinks, backpressure, or pump failure
- Cheap fittings: Low-quality plastics warp over time in cold or UV
Stick to high-quality parts built for cold plunge temps and water pressure. (More on that below.)
Want a Ready-to-Go Plumbing Kit?
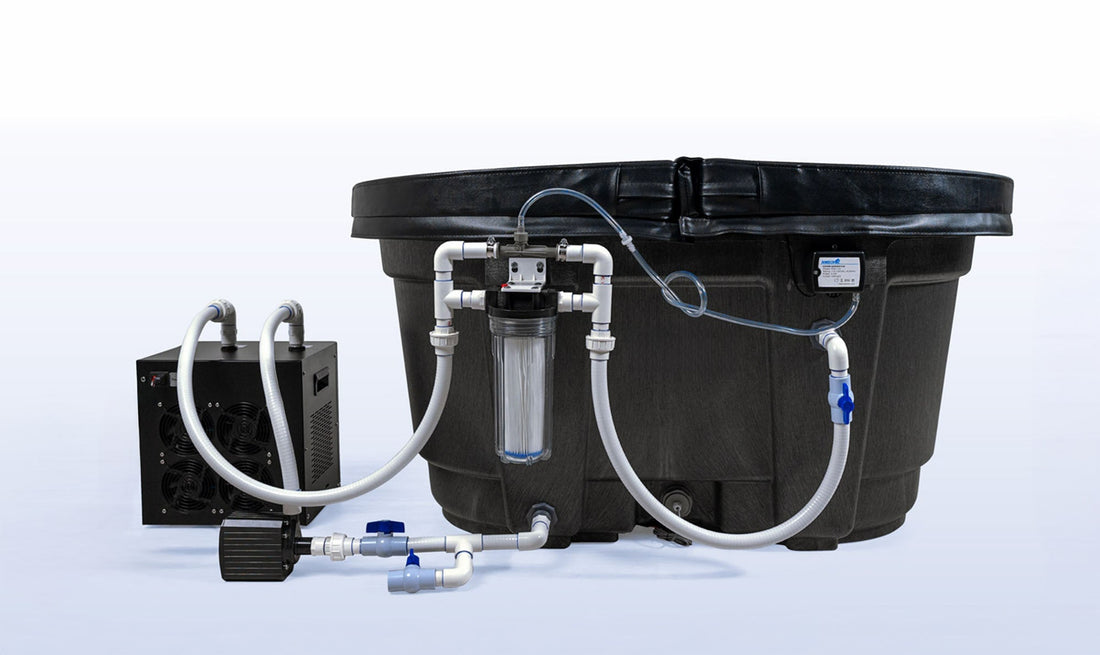
Not everyone wants to piece it all together themselves. If you want to skip the guesswork, we’ve bundled the most reliable, leak-proof cold plunge connection fittings into simple kits:
- Full 3/4” plumbing for optimal flow
- Danner Pump, Ozone and 50 micron filter
- Bulkheads, fittings and flex spa hose
- Easy-to-follow build guides
Check out the DIY Cold Plunge Build Kit
These work with stock tanks, Rubbermaid tubs, and custom barrels. Whether you're going all-DIY or upgrading a prefab setup, these save hours of trial and error.
FAQ: Cold Plunge Plumbing Kit Installation
Q: What size hole do I drill for bulkhead fittings?
Most kits include 1.75" bulkheads. Always check product specs before drilling. Use a sharp hole saw.
Q: Can I remove and reinstall fittings later?
Yes. With bulkheads and unions, you can disconnect easily for cleaning or upgrades.
Q: Do I need to seal around the fitting with silicone?
Not required, but it adds extra insurance against leaks, especially for outdoor tubs.
Q: Will these fittings work with my chiller?
We recommend using 3/4" plumbing to maximize flow. Match the fittings and tubing size to your chiller specs.
Build It Right the First Time
Installing your cold plunge plumbing right the first time means fewer headaches, better water flow, and no wet surprises under your tank.
This DIY cold plunge fittings guide is designed to help you do just that—with pro-level fit and finish.
If you’re ready to build your plunge setup with quality parts and zero guesswork, we’ve got everything you need right here: