What is the Cheapest Way to Do a Cold Plunge?
Cold plunging has taken the wellness world by storm, but investing in a high-end cold plunge tub can cost thousands of dollars. Fortunately, you don’t need to break the bank to experience the benefits of cold therapy. With a bit of creativity and a DIY approach, you can build a budget-friendly cold plunge setup at home.
In this guide, we’ll explore the cheapest ways to do a cold plunge, covering free options, DIY builds, and affordable cold plunge tubs. Whether you're searching for "how to do a cold plunge at home," "cheap cold plunge options," or "DIY cold plunge setup," this guide has got you covered.
Why Try Cold Plunging on a Budget?
Cold plunging offers a range of physical and mental health benefits, including:
- Faster muscle recovery and reduced inflammation
- Improved circulation and heart health
- Enhanced mood and stress reduction
- Stronger immune response
The best part? You don’t need an expensive setup to start reaping these benefits. There are several low-cost or even free cold plunge options available. Let’s dive into the best budget-friendly cold plunge methods.
1. The Free Option: Cold Showers
If you’re looking for the most affordable way to practice cold therapy, cold showers are the easiest solution. While they don’t provide full-body immersion, they help your body adapt to cold exposure over time.
How to Take a Cold Shower for Maximum Benefits:
- Start with warm water and gradually lower the temperature.
- Begin with 30 seconds of cold water and increase the duration over time.
- Focus on deep breathing to help your body adjust.
- Aim for 1-3 minutes under cold water for optimal results.
Pros:
- Completely free
- No extra equipment required
- Easy to incorporate into a daily routine
Cons:
- Less effective than full-body immersion
- Harder to maintain consistency in water temperature
2. DIY Cold Plunge with a Stock Tank or Plastic Tub
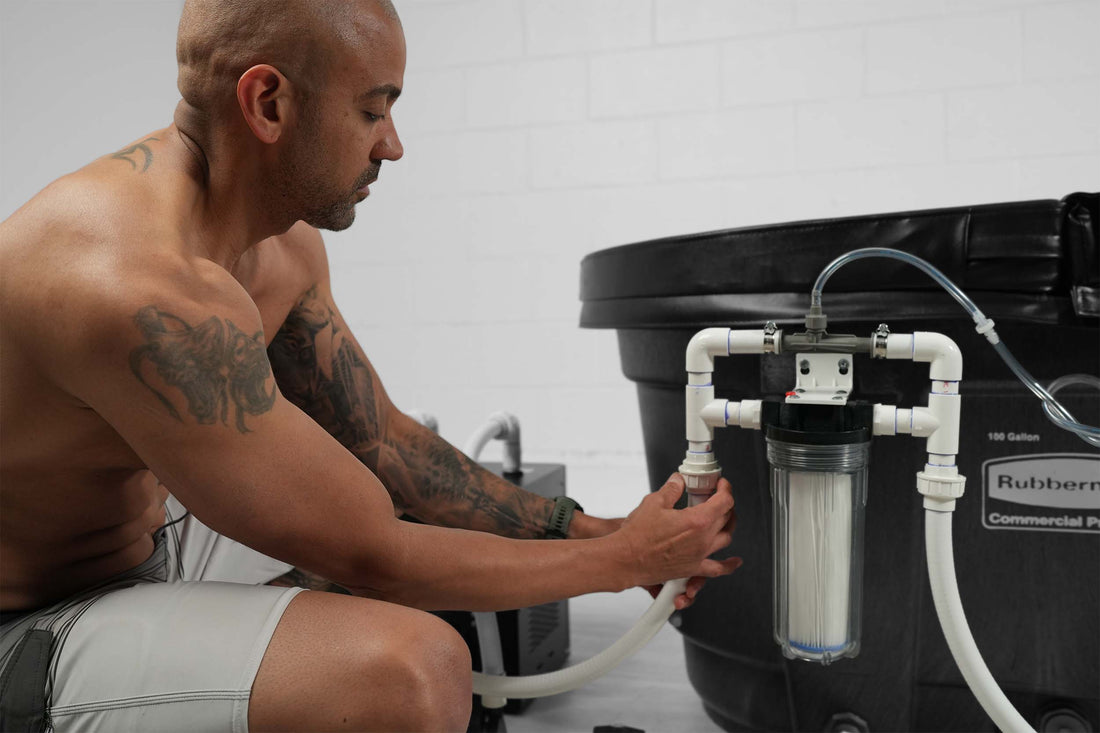
Looking for an affordable cold plunge tub? A Rubbermaid stock tank or large plastic container is a great option for a DIY cold plunge setup at home.
What You Need:
- Rubbermaid stock tank (100-150 gallons) or large plastic tub ($100–$200)
- Bags of ice ($5–$10 per session) or naturally cold water
- Water filtration system (optional, ~$50)
How to Set Up Your DIY Cold Plunge:
- Choose a large container that can fully submerge your body.
- Fill it with tap water and let it sit overnight to cool.
- Add ice if the water isn’t cold enough or use it during colder months.
- Step in slowly and submerge your body up to your chest.
- Stay in for 1-5 minutes while practicing deep breathing.
Pros:
- Affordable ($100–$200 for a reusable setup)
- Easy to set up in a backyard or garage
- No electricity required
Cons:
- Requires regular ice purchases (unless used outdoors in winter)
- Water needs to be changed frequently if not filtered
➡️ Want a guide to building a stock tank cold plunge? Check out our DIY Cold Plunge Stock Tank Build Guide.
3. Chest Freezer Cold Plunge (Budget DIY Option)
One of the most cost-effective cold plunge setups is using a repurposed chest freezer cold plunge tub. This method provides self-cooling, insulated cold water immersion.
What You Need:
- Used chest freezer (7-15 cu ft.) (~$100–$300 on Craigslist or Facebook Marketplace)
- GFCI power adapter (~$20) for safety
- Silicone sealant (~$10) to prevent leaks
- Temperature controller (optional, ~$50)
How to Set Up a Chest Freezer Cold Plunge:
- Seal the inside seams of the freezer with silicone to prevent leaks.
- Fill with water and let the freezer cool it overnight.
- Use a temperature controller to prevent overcooling and ice formation.
- Unplug before entering to ensure safety.
- Maintain cleanliness by adding an ozone generator or water filter.
Pros:
- Self-cooling without the need for ice
- More affordable than commercial cold plunges
- Keeps water at a consistent temperature
Cons:
- Requires electrical components (safety precautions needed)
- Risk of leaks if not sealed properly
4. Inflatable Ice Baths (Budget-Friendly Store-Bought Option)
For those who want an affordable store-bought cold plunge, inflatable ice baths are a great choice.
Recommended Models:
- ZenWave Ice Pod (~$150–$200)
- Ice Barrel Knockoffs (~$300–$500)
- Amazon Portable Ice Baths (~$100–$250)
How to Use:
- Fill with water and let it cool overnight.
- Add ice as needed to lower the temperature.
- Soak for 1-5 minutes while practicing deep breathing.
Pros:
- Affordable compared to high-end plunge tubs
- Portable and easy to store
- No permanent installation required
Cons:
- Ice still required for cooling
- Not as durable as hard-shell cold tubs
5. Using a Natural Water Source (Completely Free!)
If you live near a lake, river or ocean, nature provides the cheapest cold plunge option available.
Tips for Safe Natural Cold Plunging:
- Check water quality before entering.
- Be aware of currents and depth for safety.
- Wear neoprene gloves or booties if the water is extremely cold.
- Limit your time to 1-5 minutes to prevent overexposure.
Pros:
- Completely free
- No maintenance or setup required
- Natural and scenic experience
Cons:
- Dependent on location and climate
- Potential safety risks with wildlife or currents
What’s the Best Budget Cold Plunge Option?
If you’re looking for the absolute cheapest way to start, cold showers are the easiest and most accessible option. However, for a full-body experience, here’s a cost breakdown:
- Under $50: Cold showers, natural water sources
- $100–$200: DIY stock tank plunge
- $200–$400: Inflatable ice bath
- $300–$500: Chest freezer conversion
Regardless of your budget, you can experience the powerful benefits of cold plunging with a little creativity.
➡️ Explore More DIY Cold Plunge Information and Guides: